
Bluetooth® Mesh smart home dimmer switches are an innovative and efficient way to control lighting in your home.
These switches are designed to communicate with each other, creating a mesh network that allows for easy control of multiple devices. If you’re considering installing Bluetooth mesh smart home dimmer switches in your home, there are several ways to do so.
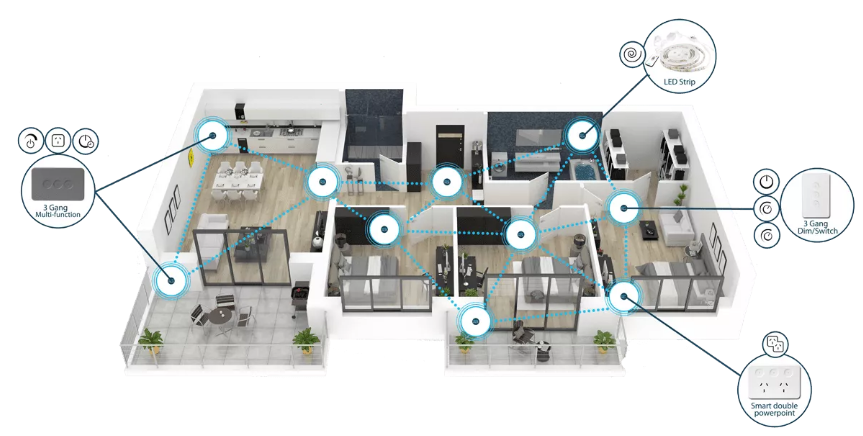
1. Distributed Smart Home System Topology
One way to install Bluetooth® Mesh smart home dimmer switches is to use a distributed system topology.
This approach involves placing multiple switches throughout your home, each of which communicates with the others to create a network. With this setup, each switch acts as a node in the mesh network, allowing for efficient communication and control.
This is the ‘recommended’ method for installation to leverage the power of the mesh network capability and reduce any special wiring and system infrastructure requirements, making it the most cost effective too.
To install this type of system, start by selecting the location for each switch. If you’re updating an existing home, using your existing switching locations is simplest and most cost effective approach, and saves on making more complex decisions about where to install these devices.
For new homes and renovations, ideally, you’ll want to place them in areas where they’ll be easy to access and where you frequently need to adjust lighting levels or control other smart home connected devices. Once you’ve chosen the locations, have your electrician install the PIXIE smart dimmers and switches at these locations.
After installation, use the PIXIE mobile app to configure each switch and set up the network.
2. Grouping of Bluetooth Mesh Devices in Key Positions Around the Home
Another way to install Bluetooth® Mesh smart home dimmer switches is to group them in key positions around your home.
This approach involves creating clusters of switches in specific areas of your home, such as near the entrance or in the living room. These clusters act as mini networks, allowing for easy control of lighting and other devices in those areas.
Approaching your installation in this way reduces the number of wall plates visible in the home which can be desirable in architecturally designed homes looking for a minimalist approach. With the addition of App and voice control with PIXIE PLUS, this is a real alternative with very few drawbacks from a control convenience aspect.
To install this type of system, start by identifying the areas where you want to create clusters of switches. Once you’ve chosen the locations, have your licensed electrician install the switches in each cluster.
After installation, use the PIXIE PLUS app to configure each cluster and set up the network.
Note that using PIXIE PLUS requires a PIXIE Gateway and deliver voice control and out-of-home control and monitoring capability too.
3. Centralised Device Installation Method with Distributed Control
A third way to install Bluetooth mesh smart home dimmer switches is to use a centralised device installation method with distributed control.
This approach involves installing all of your dimmers, switches and other controllers, such as garage door and blind controllers, into a central location.
Then at key location install a PIXIE Touch Panel, that controls all the “home run” devices in your home. Home run devices are the switches that control lighting in large areas of your home, such as the living room or bedroom.
These PIXIE Touch Panels are connected to the home network via the plug-and-play PIXIE Gateway. In this way you select a number of strategic location where a full colour touch screen is being used as the primary control interface, without the wall clutter or wall-acne associated with having scores of dimmers and switches mounted throughout the home.
This approach can be a cost effective way to migrate a legacy, wired smart home system, across to a modern wireless system with the least amount of labour and cost.
4. Smart Home Touch Panels Transformation
To install this type of system, start by identifying the home run devices in your home. Once you’ve chosen the devices, have your electrician install them in a central location – likely near the electrical distribution board in the home.
You can then configure each device and set up the network using the PIXIE PLUS App.
Then, install a number of centralised control devices, such as the PIXIE Touch Panel, in convenient locations throughout your home. The PIXIE Touch panel displays a QR code on initial operation which is simply scanned using the PIXIE PLUS App.
Within 30 seconds all of the configuration information is uploaded to the smart home touch panel and you’re in control from this location. Repeat the process for the other touch panels installed in the home.
The home owners can then configure the four multifunction buttons for rapid control of common devices in the vicinity of the smart home touch panel, setup their home page widget for fast navigation to commonly used devices, groups and scenes and even hide certain components if localised control is not desired from this particular panel.
From this point on, any additional smart home devices added to the PIXIE Bluetooth Mesh network, device name changes, group and scene additions are automatically updated to all smart home touch panels around the home without any user intervention.
Conclusion – You are Free to Choose the Method That Suits You Best
Installing Bluetooth mesh smart home dimmer switches is a great way to control lighting and other electrical devices in your home efficiently and cost effectively.
Whether you choose a distributed system topology, a grouping of mesh devices in key positions around your home, or a centralised device installation method with distributed control, these switches are easy to install and use. By following PIXIE installation instructions and using the app to configure the smart dimmers and switches, you’ll be able to create a network that meets your specific needs transforming you home into a smart home a breeze.